
2. StreamLive Inputs and Channels
In StreamLive, configure the input that receives the source and the transcoding channel, and deliver the processed video to StreamPackage. The basic procedure using the console is described first, followed by a API example.
Prerequisites
- Complete 1. StreamPackage channels and endpoints and prepare the channel ID.
- Check the target region of the same account.
- Prepare the public IP of the sending side that will access the input. When connecting StreamLink, set the access policy based on the StreamLink output-side address that actually connects to StreamLive, not on the encoder.
- The
1080p/720psettings below are examples. Adjust them to match the source resolution, frame rate, and required output quality.
1. Creating a Security Group and an Input
- Create an input access policy in Security Group in the StreamLive console.
- Allow only the actual sending IP. Enter a single IPv4 address in CIDR format, such as
203.0.113.10/32. This address is for illustration only, so replace it with the actual public IP. - In Input → Create Input, select a name and the RTMP_PUSH type.
- Attach the security group and enter the application name and stream name for Destination.
- After creation, check the push address displayed in the console. This address is used as the destination of the StreamLink Output in the next step.
Inputs A/B are separate pipelines. When configuring redundancy, check each address and sending path.
2. Configuring the Channel and Outputs
- Select Channel → Create Channel and enter the channel name.
- Connect the Input created earlier.
- Select HLS_STREAM_PACKAGE as the output group type.
- Specify the StreamPackage channel ID of the same account as the destination. A regular HLS output is a separate type that uses a HTTP PUT destination URL, so keep them distinct.
- Add two Outputs and apply the settings below in each Transcoding Setting → Setting.
| Setting | 1080p output | 720p output |
|---|---|---|
| Audio / video template name | quickstart1080p | quickstart720p |
| Video codec | H.264 | H.264 |
| Resolution | 1920 × 1080 | 1280 × 720 |
| Frame rate | 30 fps | 30 fps |
| Video bitrate | 4 Mbps | 2 Mbps |
| Audio | AAC, 128 kbps | AAC, 128 kbps |
Specify the template name with 1~20 English letters / digits. Keep the output frame rate settings within a channel the same.
Segment settings: In the Segment settings, this example is configured with the TS format, segment length 4 seconds, and list retention count 5. Check the unit displayed in the console. In the API example below, SegmentDuration: 4000 is in milliseconds. Saving the settings: Save with Confirm → Done.
3. Starting and Checking the Detail Screen
Select Start on the target channel and check the status.
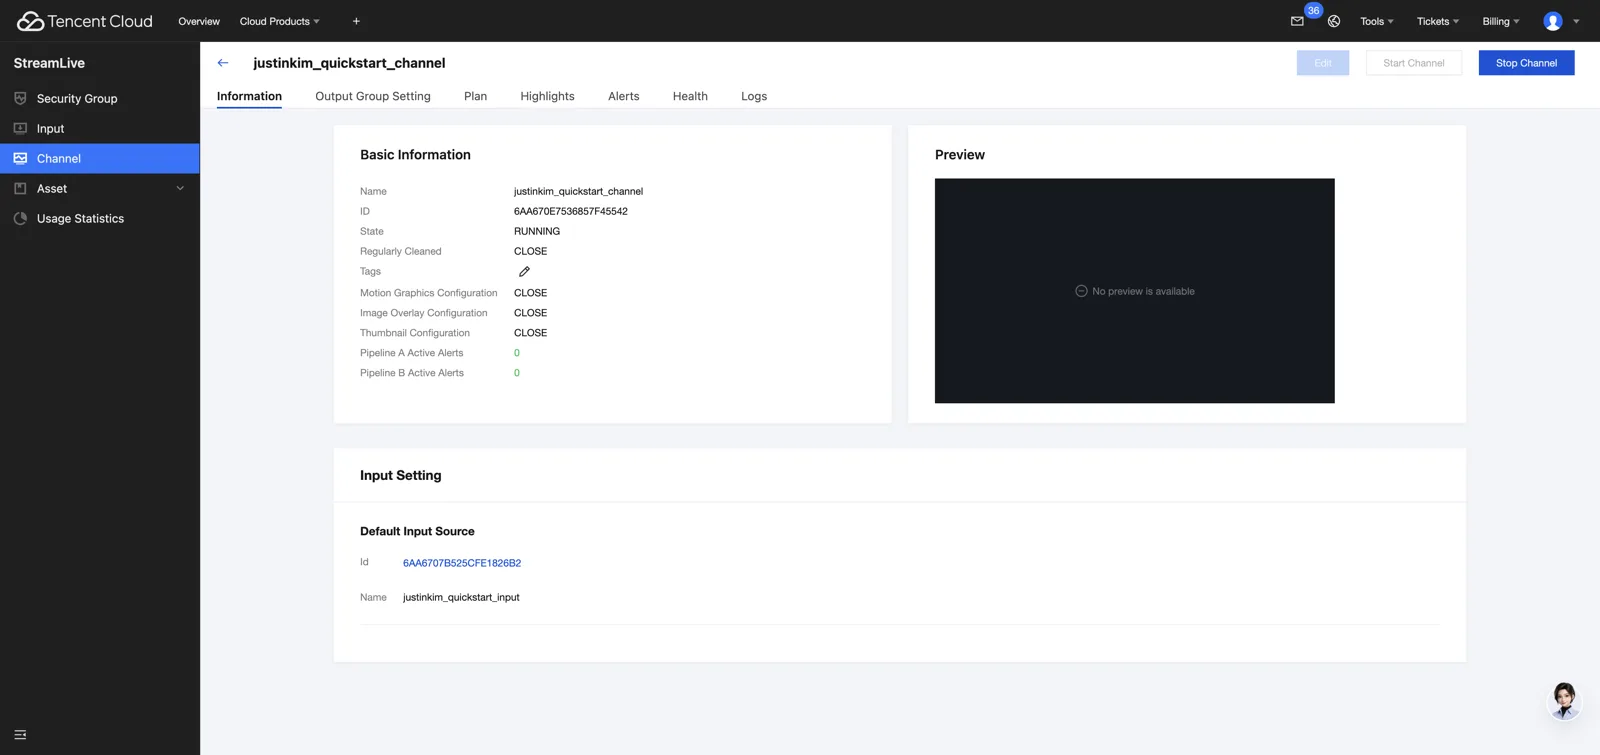
- Information → Basic Information → State: If it is
RUNNING, the channel is in the started state. - Input Setting: Check that the name and ID of the input created earlier are connected.
- Output Group Setting: Check the StreamPackage destination and the two outputs.
- Alerts / Health / Logs: Check whether there are any input or output failures.
Check the preview settings and the input status, and make the final determination by refreshing the StreamPackage media list and playing back the actual video / audio.
4. Next Steps and Ending the Test
After connecting the source feed in 3. StreamLink Flow connection, proceed with 4. Checking sending and playback.
Stop a running channel before editing its settings. When ending the test, check whether the target channel / input / security group are still in use and clean up the dedicated resources.
Official Documentation
- Input management
- Channel management and running status
- Channel basic information settings
- Output group configuration
Configuring with API
The following is a API example that creates the same configuration as the console procedure.
Creating a Security Group
Allow the sending IP that actually accesses the input. Change the IP below, which is for illustration only, to the actual public sending IP.
tccli mdl CreateStreamLiveInputSecurityGroup \
  --region ap-seoul \
  --Name justinkim_ingest_allowed \
--Whitelist 203.0.113.10/32{
"Id": "6AA6************26B1"
}203.0.113.10/32 is an address for illustration only. Change it to the public IP of the sending side that accesses StreamLive. Avoid allowing all addresses.
Creating an Input
Create it with the RTMP_PUSH type and specify AppName / StreamName. This combination becomes the push address.
tccli mdl CreateStreamLiveInput \
  --region ap-seoul \
  --Name justinkim_quickstart_input \
  --Type RTMP_PUSH \
  --SecurityGroupIds '["6AA6************26B1"]' \
--InputSettings '[{"AppName":"justinkim","StreamName":"quickstart"}]'{
"Id": "6AA6************26B2"
}When you check it, the input address is provided.
tccli mdl DescribeStreamLiveInput \
  --region ap-seoul \
--Id 6AA6************26B2{
"Type": "RTMP_PUSH",
"InputSettings": [
{
"AppName": "justinkim",
"StreamName": "quickstart",
"InputAddress": "rtmp://13******46.ap-seoul-1.streamlive.myqcloud.com"
}
]
}In other words, the push address is summarized in the following two lines.
URL       rtmp://13******46.ap-seoul-1.streamlive.myqcloud.com/justinkim
StreamKey quickstart
Creating a Channel
A channel is an execution unit that bundles an input + transcoding template + output group. Because the settings are long, create and use a JSON file.
cat > /tmp/streamlive-channel.json <<'EOF'
{
  "Name": "justinkim_quickstart_channel",
  "AttachedInputs": [{ "Id": "6AA6************26B2" }],
  "AVTemplates": [
    {
      "Name": "justinkim1080p",
      "NeedVideo": 1, "Vcodec": "H264",
      "Width": 1920, "Height": 1080, "Fps": 30,
      "VideoBitrate": 4000000, "RateControlMode": "ABR",
      "NeedAudio": 1, "Acodec": "AAC", "AudioBitrate": 128000
    },
    {
      "Name": "justinkim720p",
      "NeedVideo": 1, "Vcodec": "H264",
      "Width": 1280, "Height": 720, "Fps": 30,
      "VideoBitrate": 2000000, "RateControlMode": "ABR",
      "NeedAudio": 1, "Acodec": "AAC", "AudioBitrate": 128000
    }
  ],
  "OutputGroups": [
    {
      "Name": "justinkim_to_package",
      "Type": "HLS_STREAM_PACKAGE",
      "Outputs": [
        { "Name": "justinkimout1080p", "AVTemplateNames": ["justinkim1080p"] },
        { "Name": "justinkimout720p",  "AVTemplateNames": ["justinkim720p"] }
      ],
      "Destinations": [
        { "OutputUrl": "https://13******46.ap-seoul.streampackage.srclivepush.myqcloud.com/v1/01a0****96005/01a0****96006" }
      ],
      "HlsRemuxSettings": {
        "SegmentDuration": 4000,
        "SegmentNumber": 5,
        "Scheme": "MERGE",
        "SegmentType": "ts"
      },
      "StreamPackageSettings": { "Id": "6AA6************32BF" }
    }
  ]
}
EOF
After saving the JSON file, create the channel with the following command.
tccli mdl CreateStreamLiveChannel \
  --region ap-seoul \
--cli-input-json file:///tmp/streamlive-channel.json{
"Id": "6AA6************5542"
}Configuration Items
| Item | Value | Meaning |
|---|---|---|
Type | HLS_STREAM_PACKAGE | Output type that pushes HLS into StreamPackage |
Destinations.OutputUrl | StreamPackage Input URL | Address obtained in the 1 step |
StreamPackageSettings.Id | Channel ID | Specifies the destination channel |
SegmentDuration | 4000 | Segment 4 seconds |
SegmentNumber | 5 | Number of segments to keep in the playlist |
Scheme | MERGE | Bundles audio and video into a single TS |
Include only one AVTemplateNames per output. If you put both 1080p and 720p into one output, it is created but only one rendition is produced. To build a ABR ladder, you must create as many outputs as there are templates.
Use English letters / digits for the transcoding template name, as in streamlive1080p. Underscores can be used in the channel name.
Starting the Channel
tccli mdl StartStreamLiveChannel \
  --region ap-seoul \
  --Id 6AA6************5542
Check that the status is RUNNING. In the next step, check the actual sending and playback.
tccli mdl DescribeStreamLiveChannels --region ap-seouljustinkim_quickstart_channel 6AA6************5542 RUNNINGRTMP Input Creation Screen
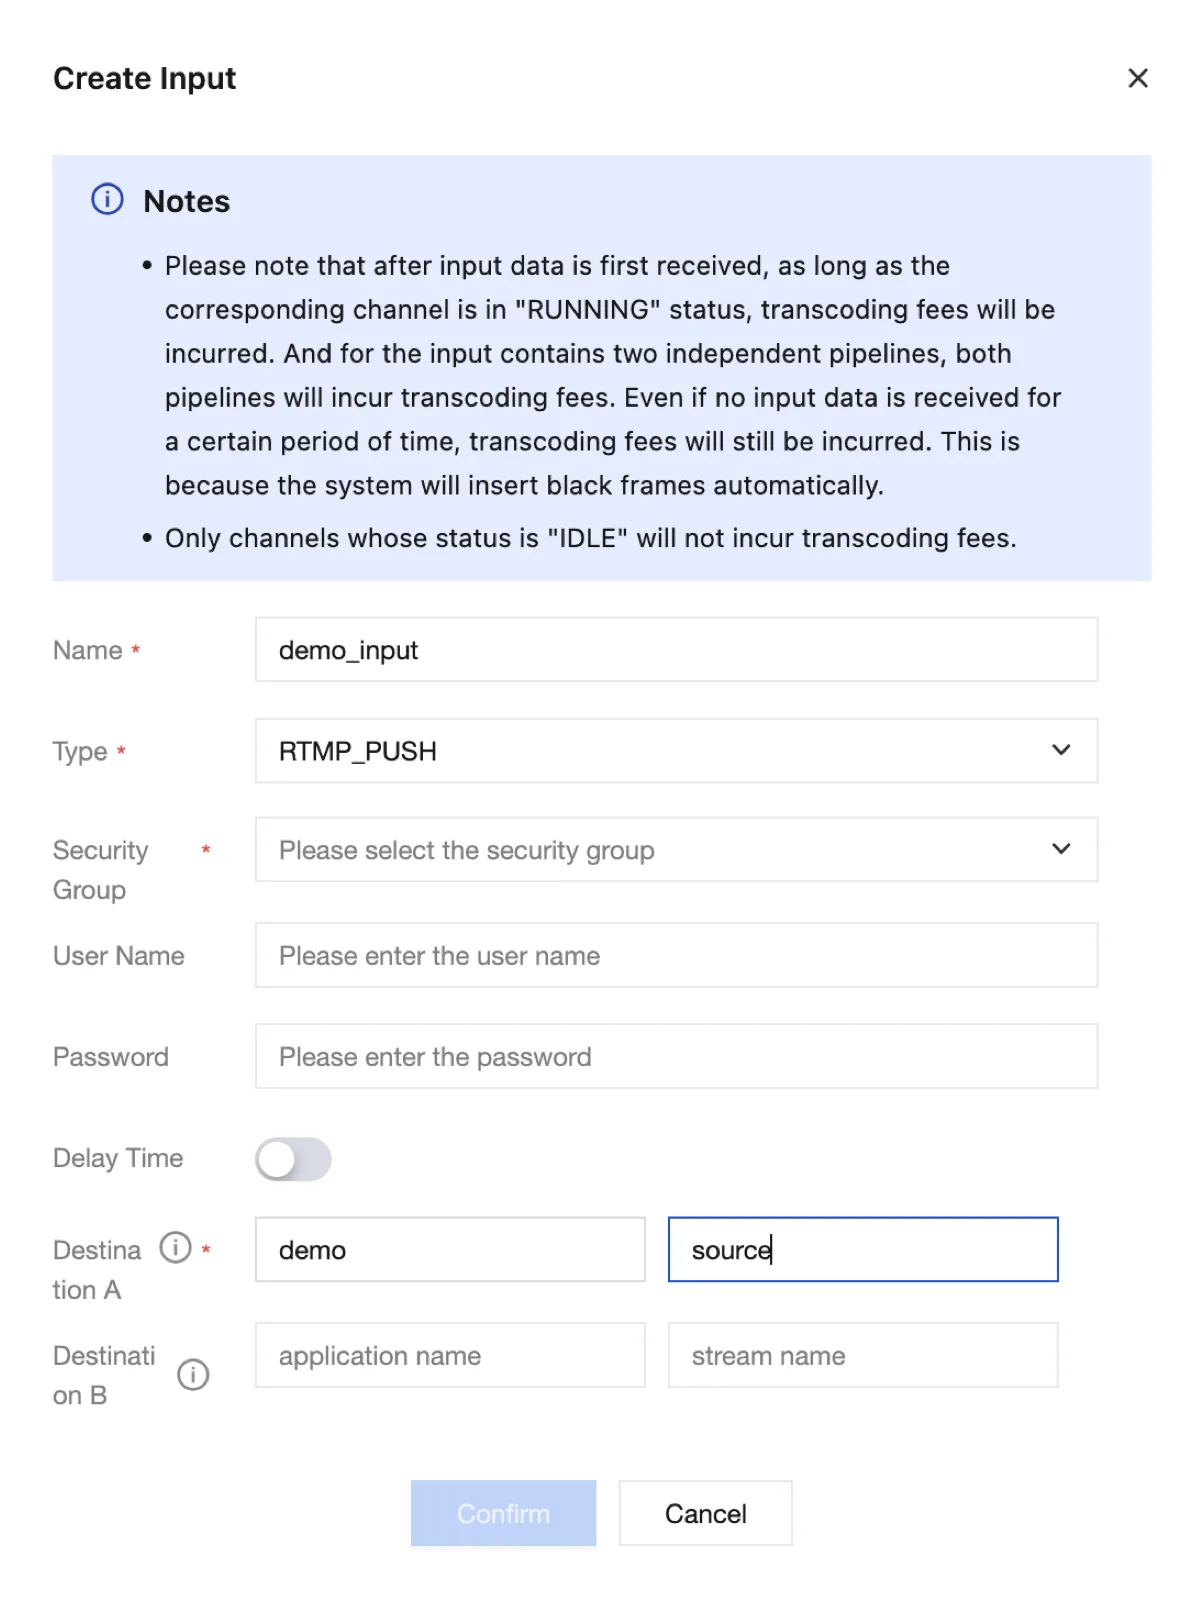
In the RTMP_PUSH input creation form, select the Security Group, specify the application name and stream name in Destination A, and then press Confirm. Destination B is used for the second pipeline.